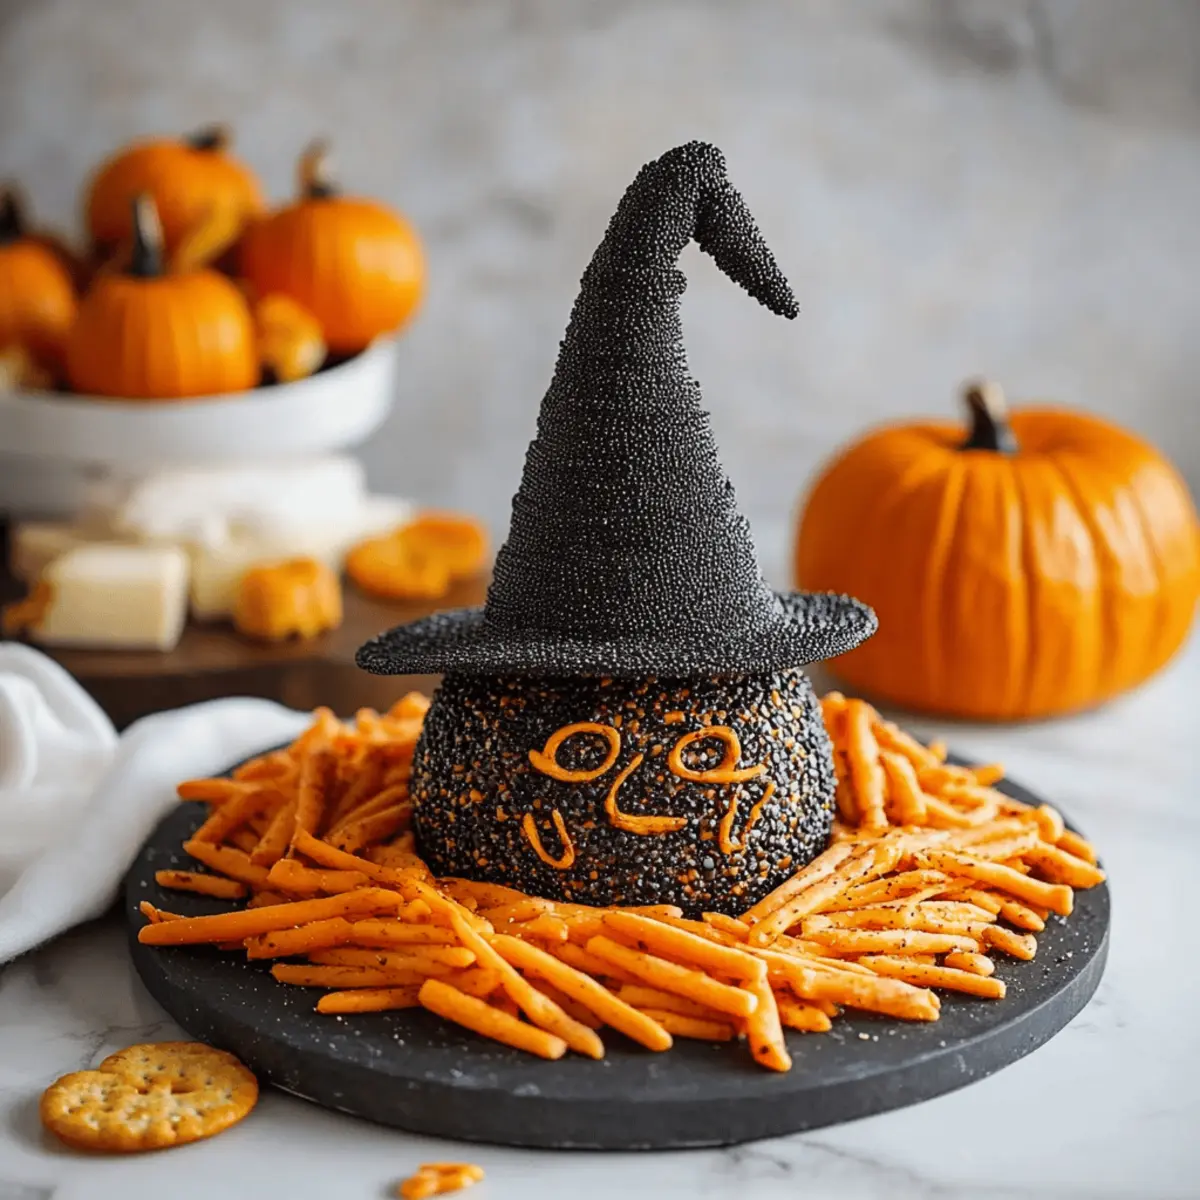
As Halloween approaches, I can almost hear the crunch of leaves and feel the excitement in the air. This is the perfect time to bring a touch of whimsy to your gatherings with my Witch Hat Halloween Cheese Ball. This no-cook appetizer is not only a fun conversation starter but also a delight for both eyes and taste buds. With its creamy interior and poppy seed exterior, it’s versatile enough to accommodate various tastes, making it a crowd-pleaser. Plus, it can be prepped in advance, allowing you to relax and enjoy your party without last-minute stress. Ready to add a little magic to your Halloween spread? Let’s get started on creating this enchanting cheese ball!

Why is This Recipe So Magical?
Unique Design: This Witch Hat Halloween Cheese Ball stands out with its whimsical witch hat shape, becoming the centerpiece of your festive spread.
No-Cook Wonder: Effortlessly whip it up with minimal fuss—perfect for busy home chefs craving easy yet impressive dishes.
Flavorful Creaminess: The blend of cream cheese and sharp white cheddar offers a delightful creamy texture that pairs beautifully with your favorite dippers.
Customizable Ingredients: Feel free to swap ingredients according to your taste; whether you prefer smoked gouda or a kick of pepper jack, the options are endless!
Make-Ahead Ease: Prepare this cheese ball up to 3 days in advance, allowing you to enjoy your party instead of scrambling in the kitchen.
Crowd Appeal: It's a festive treat that appeals to both kids and adults, ensuring everyone leaves happy!
Witch Hat Halloween Cheese Ball Ingredients
• Perfect for a magical Halloween gathering!
For the Cheese Ball
- Cream Cheese – This creamy base should be at room temperature for easy mixing.
- Sharp White Cheddar – Adds depth; feel free to substitute with smoked gouda or pepper jack for unique flavors.
- Ranch Seasoning – Enhances taste; consider using homemade ranch seasoning to customize your flavor profile.
For the Exterior
- Poppy Seeds – These create the signature witch hat texture; sesame seeds can be used as a substitute if needed.
Optional Garnish
- Fresh Parsley/Chives – Adds a pop of color and freshness to complete your Witch Hat Halloween Cheese Ball presentation.
Step‑by‑Step Instructions for Witch Hat Halloween Cheese Ball
Step 1: Prepare the Ingredients
Start by allowing the cream cheese and sharp white cheddar to soften at room temperature for 30 to 60 minutes. This step is crucial as it ensures smooth mixing and a creamy texture for your Witch Hat Halloween Cheese Ball. While waiting, gather your mixing equipment, such as a stand mixer or a large mixing bowl and a hand mixer.
Step 2: Mix the Cheese Base
In your stand mixer or using a hand mixer, combine the softened cream cheese, sharp white cheddar, and ranch seasoning. Beat the mixture on medium speed until it’s beautifully smooth and creamy, about 2 to 3 minutes. This flavorful base gives the cheese ball its delightful taste and sets the foundation for shaping your whimsical creation.
Step 3: Shape the Cheese Ball
Divide the mixed cheese into two portions: one third for the brim and two thirds for the witch hat's top. Flatten the smaller portion into a disc shape for the brim on a piece of plastic wrap, then form the larger portion into a cone shape for the hat top. The combination of these shapes creates the enchanting look of your Witch Hat Halloween Cheese Ball.
Step 4: Chill for Firmness
Wrap both the brim and the cone-shaped cheese portions tightly in plastic wrap. Place them in the refrigerator and chill for at least 4 hours, or preferably overnight. This chilling period allows the flavors to meld together and firms up the shapes, making it easier to handle when it's time to coat it in poppy seeds.
Step 5: Coat with Poppy Seeds
Once the cheese ball shapes have chilled and firmed up, remove them from the refrigerator. Carefully unwrap them and coat the cone (the hat) with poppy seeds by gently pressing them into the cheese. Ensure the entire surface is covered for that authentic witch hat texture that makes your Witch Hat Halloween Cheese Ball visually striking.
Step 6: Assemble and Serve
Now it’s time to present your whimsical creation! Position the cone atop the disc to form the complete witch hat. If desired, add fresh parsley or chives as decorative accents. Arrange your cheese ball on a platter surrounded by your favorite dippers such as crackers, pretzels, or veggies, creating a festive and inviting display for your Halloween gathering.

Make Ahead Options
These Witch Hat Halloween Cheese Balls are perfect for meal prep enthusiasts! You can prepare the cheese mixture and shape it into a witch hat up to 3 days in advance. Simply follow the initial steps, then wrap the formed cheese ball tightly in plastic wrap and refrigerate it to maintain its freshness and texture. To enhance its flavor, allow it to chill overnight. When you’re ready to serve, unroll the cheese ball, coat it with poppy seeds, and assemble the brim and cone. This way, you can enjoy a whimsical, delicious appetizer with minimal last-minute effort, leaving you free to focus on the fun of your Halloween gathering!
Witch Hat Halloween Cheese Ball Variations
Invite your creativity to shine as you personalize this fun appetizer with delightful twists that suit your taste!
-
Cheese Options: Swap sharp white cheddar for smoked gouda or pepper jack for a unique flavor experience. The smoky notes or spicy kick will elevate your cheese ball in surprising ways!
-
Herb Infusion: Add fresh herbs like dill or chives into the cheese mixture. This will create an aromatic burst with every bite—perfect for herb lovers who appreciate a fresh twist!
-
Nutty Crunch: Incorporate chopped nuts like walnuts or pecans into the cheese blend for added texture and a nutty flavor. This little crunch can transform the creamy ball into an exciting treat.
-
Sweet Surprise: Drizzle honey or add a few dried cranberries to your cheese mixture. The sweet notes can beautifully complement the savory, making every bite an unexpected delight.
-
Spicy Twist: Mix in some jalapeño or red pepper flakes for a zesty heat. This is a fantastic way to appeal to those who crave a little kick in their appetizers!
-
Gluten-Free Alternative: Serve with gluten-free crackers or veggie sticks instead of regular crackers. This inclusive option allows everyone to join the fun without the worry.
-
Flavorful Seasoning: Switch ranch seasoning for Italian seasoning or smoky paprika to introduce fresh flavor notes. The change will give your cheese ball an entirely new personality!
-
Veggie Boost: Fold in finely chopped bell peppers or green onions for a delicious crunch. This adds freshness and a pop of color to your cheese ball, making it visually appealing!
Let your culinary imagination run wild! By customizing the Witch Hat Halloween Cheese Ball, you not only cater to your tastes but also create something truly special for your Halloween gatherings.
What to Serve with Witch Hat Halloween Cheese Ball
Get ready to craft the perfect Halloween spread alongside a delightful main attraction that will charm both kids and adults.
- Assorted Crackers: The crunchy texture of assorted crackers perfectly complements the creamy cheese ball, adding variety to each bite.
- Pretzel Sticks: These provide a delightful crunch that pairs well with the cheese ball's smoothness, enhancing your festive snacking experience.
- Veggie Platter: Fresh celery and bell peppers not only brighten up the platter but also add a refreshing crunch to contrast the cheese's richness.
- Fruity Dips: Consider serving it alongside a sweet apple or pear chutney. The fruity sweetness beautifully balances the savory flavors of the cheese ball.
- Chips: Tortilla chips offer a delightful salty crunch, making them an excellent partner for dipping into the witch hat's creamy goodness.
- Wine Pairing: A crisp, chilled white wine like Sauvignon Blanc can enhance the flavors beautifully, elevating your gathering with a touch of elegance.
Expert Tips for Witch Hat Halloween Cheese Ball
-
Soften Cheese Properly: Ensure cream cheese and cheddar are at room temperature before mixing. This prevents a lumpy texture and promotes creaminess in the cheese ball.
-
Keep It Firm: If the brim feels too soft, freeze it for 30 minutes before adding the hat top. This helps maintain its shape.
-
Flavor Variations: Don’t hesitate to customize the cheeses in your Witch Hat Halloween Cheese Ball. Try different combinations like mozzarella or a blend of cream cheeses for unique flavors!
-
Optional Garnish: Enhance presentation with fresh parsley or chives. They add a splash of color that makes your dish more appealing.
-
Storage Advice: Wrap tightly and store in the refrigerator. Enjoy your cheese ball within 3 days for the best taste and freshness!
-
Serving Ideas: Pair with an assortment of crackers, pretzol sticks, or vibrant veggie platters to create a complete Halloween spread.
Storage Tips for Witch Hat Halloween Cheese Ball
- Fridge: Store your cheese ball tightly wrapped in plastic wrap for up to 3 days to maintain its texture and freshness.
- Freezer: If needed, you can freeze the assembled cheese ball for up to 2 months. Just wrap it tightly in plastic wrap and foil to prevent freezer burn.
- Thawing: To enjoy your frozen Witch Hat Halloween Cheese Ball, transfer it to the fridge for 24 hours before serving to allow it to thaw gently.
- Reheating: There's no need to reheat; simply serve chilled with your favorite dippers for a delightful appetizer at your Halloween gathering.
Witch Hat Halloween Cheese Ball Recipe FAQs
What should I look for when selecting cream cheese?
Absolutely! When choosing cream cheese, opt for a block of full-fat variety—this will ensure a creamy texture. Look for packages with no visual signs of damage, and check for a "best by" date that’s fresh. Make sure it’s at room temperature before mixing to achieve the smoothest results.
How long can I store my Witch Hat Halloween Cheese Ball in the fridge?
Very! You can store your cheese ball tightly wrapped in plastic wrap in the refrigerator for up to 3 days. This helps maintain its delightful texture and flavor. Remember to keep it sealed well to prevent it from drying out or absorbing other odors from your fridge.
Can I freeze the Witch Hat Halloween Cheese Ball?
Absolutely! You can freeze your assembled cheese ball for up to 2 months. Just wrap it tightly in plastic wrap, then in aluminum foil to prevent freezer burn. When you're ready to enjoy it, place it in the fridge to thaw for 24 hours before serving, ensuring a delicious appetizer without any hassle.
What if the cheese ball is too soft to shape properly?
No worries! If you find that your cheese ball is too soft to shape easily, simply pop it in the freezer for about 30 minutes. This will firm it up, making it easier to create the desired shapes without losing that whimsical witch hat design. Just be sure to keep an eye on it to avoid freezing it too hard!
Can pets or people with dairy allergies enjoy this recipe?
It's important to keep in mind that this recipe contains dairy ingredients like cream cheese and cheddar, which could cause allergic reactions in those with lactose intolerance or dairy allergies. You could consider using non-dairy cream cheese or a nut-based cheese alternative for those who are sensitive or prefer plant-based options. Adjust your ranch seasoning accordingly to ensure everyone can enjoy it!
Can I customize the flavors of the cheese ball?
Absolutely! One of the best parts of this Witch Hat Halloween Cheese Ball is its versatility. Feel free to experiment! Try adding garlic powder, herbs de Provence, or using different cheese types like smoked gouda or pepper jack. These variations allow you to make this no-cook appetizer truly your own!

Witch Hat Halloween Cheese Ball
Ingredients
Equipment
Method
- Allow the cream cheese and sharp white cheddar to soften at room temperature for 30 to 60 minutes.
- In a mixing bowl, combine the softened cream cheese, sharp white cheddar, and ranch seasoning. Beat until smooth and creamy, about 2 to 3 minutes.
- Divide the mixture into two portions: one third for the brim and two thirds for the hat. Shape the smaller portion into a disc for the brim and the larger into a cone for the hat.
- Wrap both portions tightly in plastic wrap and refrigerate for at least 4 hours or overnight.
- Once chilled, unwrap and coat the cone shape with poppy seeds, ensuring full coverage.
- Assemble by placing the cone atop the disc to form the complete witch hat. Garnish with parsley or chives if desired.


Leave a Reply