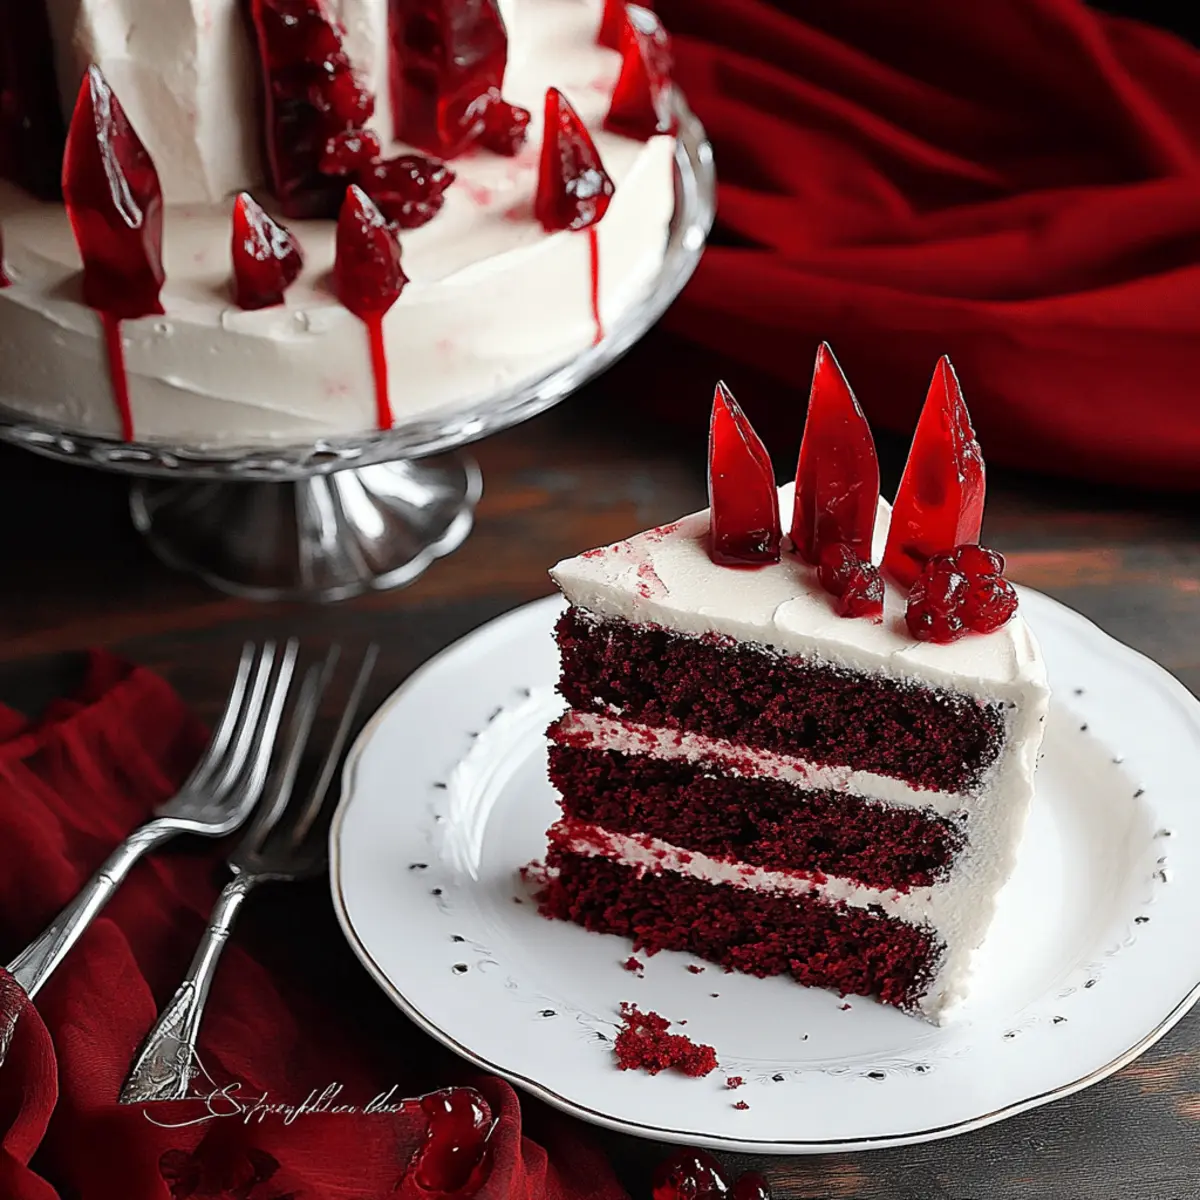
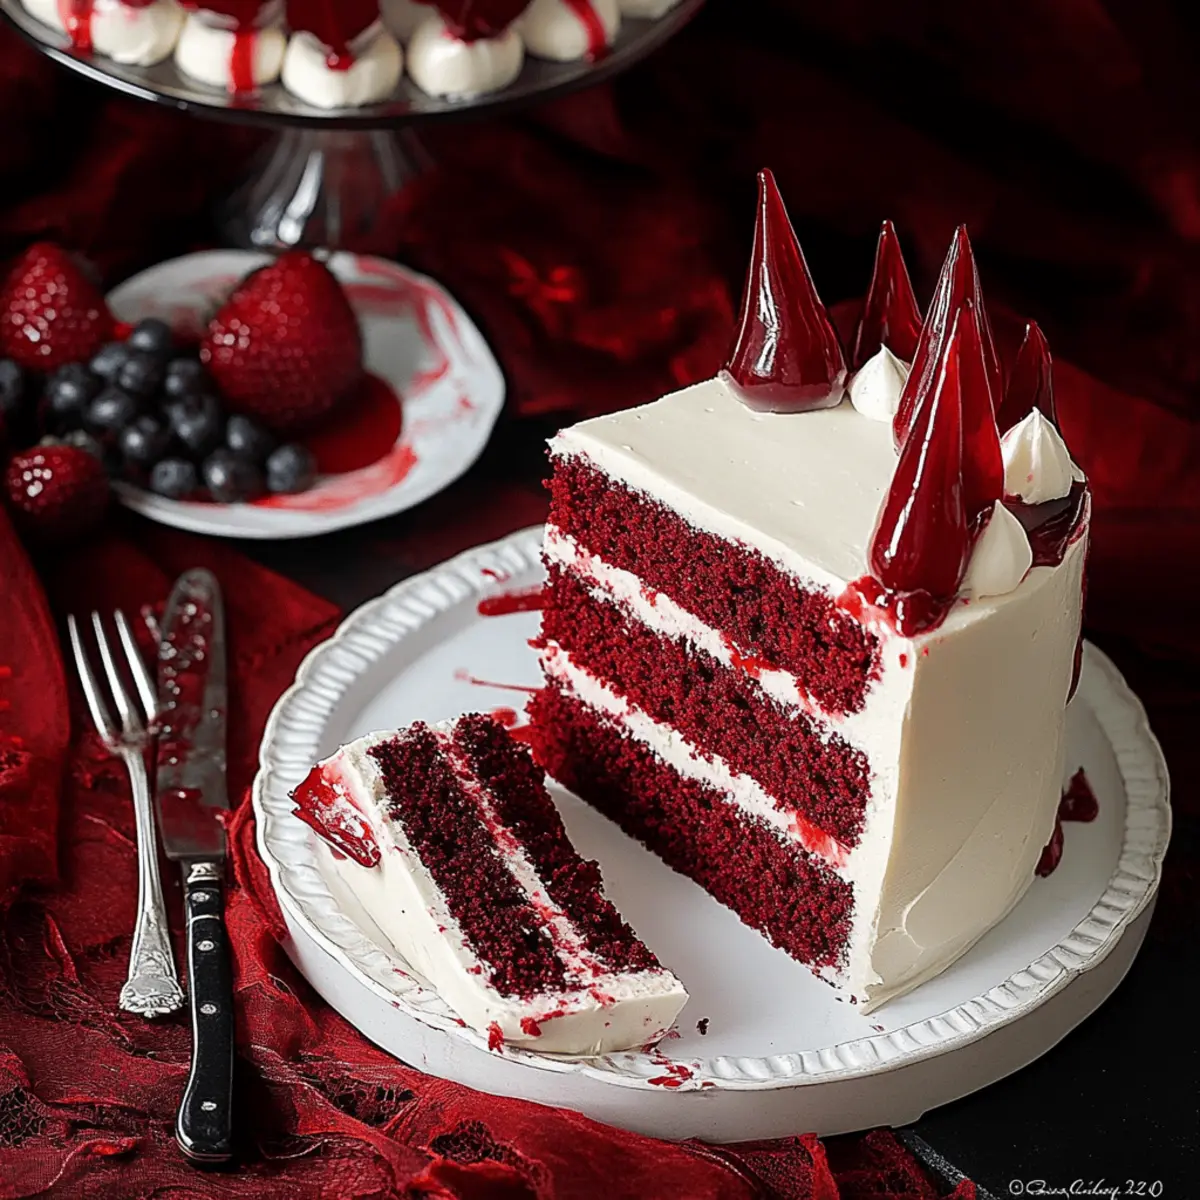
As I sliced through the layers of this stunning creation, a wave of rich aroma enveloped me, instantly transporting me to a joyous Halloween gathering. The Bloody Red Velvet Cake is more than just a dessert; it’s a dramatic centerpiece that boasts moist, velvety layers adorned with ethereal Swiss meringue buttercream. Topped with striking candy glass shards and a luscious white chocolate “blood” ganache, this showstopper dessert is perfect for any special occasion. Not only does it elevate your baking game, but it also provides the thrill of creating something that’s both breathtakingly beautiful and delightfully delicious. Are you ready to impress your guests and make memories that linger long after the last slice? Let’s dive into this delicious adventure together!

Why is this cake a must-try?
Showstopper Appeal: This Bloody Red Velvet Cake is not just a treat; it's a visual masterpiece that will steal the spotlight at any gathering.
Irresistible Flavor: With moist layers kissed by velvety buttercream, every bite packs a rich taste that perfectly balances sweetness and color.
Perfect for Occasions: Whether it’s Halloween, birthdays, or any festive event, this cake is designed to impress and create unforgettable memories.
Easy Variations: Feeling adventurous? You can swap ingredients like using beet juice for coloring or even trying different flavored ganaches to customize your cake experience.
Fun to Make: Get lost in the creative process of crafting candy glass shards—it’s a mesmerizing way to engage with the art of baking!
Impressive Layering: The dramatic contrast between the fluffy red velvet and the shimmering candy makes for stunning slices that are as fun to eat as they are to look at.
Embark on this delicious journey by exploring our tips for the perfect Swiss meringue buttercream to complement your cake!
Bloody Red Velvet Cake Ingredients
For the Candy Glass
- Granulated Sugar – Sweetness and moisture; can substitute with coconut sugar for a less refined option.
- Light Corn Syrup – Prevents crystallization in candy glass; substitute with glucose syrup if needed.
- Water – Acts as a dissolving medium for sugar.
- Cream of Tartar – Stabilizes sugar syrup for candy; can be left out but may affect quality.
For the Cake
- Butter (softened) – Adds richness and moisture to the cake; use vegan butter for a dairy-free version.
- Granulated Sugar – Sweetens the cake; you can substitute with brown sugar for deeper flavor.
- Brown Sugar (light) – Contributes depth of flavor; can use more granulated sugar if needed.
- Eggs – Provide structure and moisture; for a vegan version, use flax eggs.
- Sour Cream – Enhances moisture and texture; Greek yogurt works as a substitute.
- Vanilla Extract – Essential for flavor enhancement.
- Vinegar – Reacts with baking soda for leavening; can substitute with lemon juice.
- Buttermilk – Provides tanginess and moisture; milk with vinegar can imitate buttermilk.
- Red Food Coloring – Necessary for the cake’s signature color; opt for gel food coloring for richer shades.
- Flour (all-purpose) – Gives structure to the cake; whole wheat flour is a healthier option.
- Cocoa Powder (unsweetened) – Adds a hint of chocolate flavor; dark cocoa can intensify the taste.
- Baking Powder & Baking Soda – Essential leavening agents for the cake rise.
- Salt – Enhances all the flavors.
For the Meringue Buttercream
- Egg Whites – Used for the buttercream; can replace with aquafaba for a vegan option.
- Granulated Sugar – Sweetens the meringue; ensures stability in the frosting.
- Salt – Balances the sweetness of the buttercream; enhance overall flavor experience.
For the Ganache Topping
- Heavy Cream – Used for making the ganache; coconut cream can be a substitute for a dairy-free option.
- White Chocolate – Creates the luxurious ganache; use dairy-free chocolate to make it vegan.
- Dark Chocolate (for shavings) – Adds texture and richness; milk chocolate can be an alternative for a sweeter taste.
Let these ingredients guide you toward crafting your unforgettable Bloody Red Velvet Cake, a dessert that’s all about wow factor and delight!
Step‑by‑Step Instructions for Bloody Red Velvet Cake
Step 1: Prepare Candy Glass
In a saucepan, combine granulated sugar, light corn syrup, water, and cream of tartar. Stir over medium heat until dissolved, then increase the heat and boil until the mixture reaches a hard crack stage of 300ºF. Pour the hot mixture onto a parchment-lined baking sheet and let it cool completely for about 2 hours before breaking it into dramatic candy glass shards.
Step 2: Preheat Oven and Prepare Pans
Preheat your oven to 350ºF (175ºC) while you prepare your cake pans. Grease two 9-inch round cake pans with butter, then line the bottoms with parchment paper to ensure easy removal. This will help create the perfect foundation for your Bloody Red Velvet Cake, preventing sticking and allowing the cakes to rise beautifully.
Step 3: Mix Dry Ingredients
In a large mixing bowl, whisk together the all-purpose flour, cocoa powder, baking powder, baking soda, and salt. Ensure all dry ingredients are evenly combined. This essential step will help maintain the texture and flavor of your Bloody Red Velvet Cake, creating a rich and moist crumb that everyone will love.
Step 4: Cream Butter and Sugars
In your stand mixer or a large mixing bowl, cream the softened butter with both granulated and brown sugars until the mixture is light and fluffy, about 3-5 minutes. This step is crucial for incorporating air into your batter, which will yield a light, airy cake. Add the eggs one at a time, mixing well after each addition for a smooth consistency.
Step 5: Add Wet Ingredients
Blend in the sour cream, vanilla extract, and vinegar, mixing thoroughly until well combined. This will enhance the moisture and flavor of the Bloody Red Velvet Cake, helping it to achieve that signature velvety texture. Scrape down the sides of the bowl to ensure everything is well incorporated.
Step 6: Combine Buttermilk and Color
In a separate bowl, combine the buttermilk and red food coloring, stirring until the color is uniform. Gradually add this mixture to the dry ingredients, alternating with the flour mixture, until everything is well blended and smooth. This step is vital for achieving the iconic red hue of your cake while maintaining a balanced batter.
Step 7: Bake the Cake
Divide the cake batter evenly between the prepared pans and smooth the tops with a spatula. Bake in the preheated oven for 25-27 minutes or until a toothpick inserted in the center comes out clean. Once baked, allow the cakes to cool in their pans for 10 minutes before transferring them to wire racks to cool completely.
Step 8: Make Meringue Buttercream
While the cakes cool, prepare the Swiss meringue buttercream. In a heatproof bowl, whisk together egg whites, granulated sugar, and a pinch of salt over simmering water until the sugar dissolves. Remove from heat and whip the mixture until glossy and cool. Gradually add softened butter, mixing until the buttercream is smooth and creamy.
Step 9: Prepare the Ganache
To create the white chocolate ganache, gently heat heavy cream and the white chocolate in a saucepan over low heat, stirring until fully melted and smooth. Stir in a few drops of red food coloring to achieve a bloody effect. Allow the ganache to cool slightly until it becomes pourable and ideal for drizzling over the cake.
Step 10: Layer the Cake
Once cakes have cooled completely, begin layering your Bloody Red Velvet Cake. Spread a generous layer of meringue buttercream between the cake layers, adding dark chocolate shavings for added texture. Stack the layers and place the assembled cake in the freezer for about 30 minutes to set.
Step 11: Frost and Decorate
After chilling, frost the outer layer of the cake with the remaining meringue buttercream. Finish by pouring the white chocolate ganache over the top, allowing it to drip down the sides. Finally, decorate the cake with the candy glass shards and any additional ganache as desired, creating a stunning presentation for your showstopper dessert.

Expert Tips for Bloody Red Velvet Cake
Tempered Egg Whites: Ensure your egg whites for the meringue reach room temperature before using—they whip up better and create a silky texture.
Avoid Curdled Buttercream: If your buttercream starts to curdle, just keep whipping it! It will come together once it’s cooled properly.
Use Gel Food Coloring: For vibrant color without adding extra moisture to your cake, opt for gel food coloring. It gives that signature “bloody” hue!
Chill Components: Chill your cakes and frosting before assembling to help them hold their shape and make layering easier.
Slicing Safety: When cutting the cake, be mindful of the candy glass shards; they can be sharp! Make sure everyone knows before serving.
How to Store and Freeze Bloody Red Velvet Cake
Fridge: Store your leftover Bloody Red Velvet Cake in an airtight container for up to 4 days to maintain its moisture and flavor.
Freezer: For longer storage, wrap slices tightly in plastic wrap and aluminum foil, then freeze for up to 2 months. This keeps them fresh and delicious!
Reheating: Thaw cake slices in the refrigerator overnight or at room temperature for a few hours before enjoying. If desired, warm in the microwave for about 10-15 seconds before serving.
Decoration: If you’ve already decorated with candy glass shards, it's best to store those separately and add them fresh when ready to serve, ensuring they remain crisp.
Bloody Red Velvet Cake Variations
Feel free to let your creativity shine and customize this delightful cake to suit your taste and preferences!
-
Dairy-Free: Use coconut cream instead of heavy cream for the ganache and vegan butter in the cake for a delightful dairy-free version.
-
All-Natural Color: Swap red food coloring with beet juice to achieve a natural, vibrant hue while adding a touch of healthiness.
-
Flavor Infusion: Add coconut extract or almond extract in place of vanilla to give your cake a unique twist that tantalizes the taste buds.
-
Gluten-Free: Substitute all-purpose flour with a gluten-free blend to create a dessert that everyone can enjoy without sacrificing flavor or texture.
-
Rich Ganache: Try using dark chocolate instead of white chocolate for the ganache to bring a rich, intense flavor that perfectly complements the red velvet cake.
-
Extra Crunch: Fold in crushed nuts or toffee bits into the batter for delightful texture and an unexpected crunch in every bite.
-
Caramel Surprise: Drizzle warm caramel sauce in between the layers before frosting for a sweet surprise that elevates the cake experience.
-
Spiced Variation: Incorporate a teaspoon of cinnamon or nutmeg into the dry ingredients to bring a warm, cozy flavor perfect for holiday gatherings.
There you have it—a treasure trove of variations to make your Bloody Red Velvet Cake uniquely yours! Don't forget to check out our tips on crafting an utterly irresistible Swiss meringue buttercream that elevates this dessert to breathtaking heights!
What to Serve with Bloody Red Velvet Cake
As you present this visually stunning dessert, consider complementary dishes that elevate the entire dining experience.
- Lightly Brewed Coffee: The subtle bitterness of coffee perfectly contrasts the sweetness of the cake, enhancing its indulgent flavors.
- Rich Red Wine: A glass of merlot or cabernet can bring out the chocolate notes in the cake, making for a sophisticated pairing.
- Vanilla Ice Cream: A scoop of creamy vanilla provides a delightful contrast to the cake's rich flavors while adding a refreshing balance. The cold temperature also intensifies the cake's moist texture, creating a delightful harmony.
- Chocolate Dipped Strawberries: These sweet and juicy treats echo the cake's flavors, offering a fresh, fruity complement that is visually appealing.
- Pumpkin Spice Cheesecake Bites: These bites can add a seasonal twist, echoing the cozy vibes of fall while striking a balance with the Bloody Red Velvet Cake.
- Caramel Apple Salad: This sweet and tangy salad provides a refreshing brightness, cutting through the richness of the cake with every bite.
- Chocolate Tart: A luscious chocolate tart brings another layer of decadence to your dessert table, appealing to chocolate lovers.
- Sparkling Water with Citrus: A zesty sparkling drink refreshes the palate, balancing the sweetness of the cake while providing a bubbly celebration to the occasion.
- Cornbread Muffins: Savory cornbread muffins add a hearty touch to the meal, allowing you to enjoy a wonderful interplay of flavors with the soft sweetness of the cake.
- Sugar Cookies: Simple yet delightful, these cookies offer a fun, playful finish to your meal, echoing the whimsical nature of the cake.
Make Ahead Options
These Bloody Red Velvet Cakes are a dream for meal prep enthusiasts! You can prepare the candy glass up to 24 hours in advance; simply store it in an airtight container to prevent humidity from making it sticky. The cake layers can also be baked and cooled up to 3 days ahead; wrap them tightly in plastic wrap and refrigerate them. For the frosting, make the Swiss meringue buttercream in advance, and store it in the fridge; just be sure to re-whip for a smooth texture before frosting. When you’re ready to complete your cake, simply layer the frosting, add your delightful ganache, and finish with the striking candy glass shards for a show-stopping dessert that’s just as delicious!
Bloody Red Velvet Cake Recipe FAQs
What’s the best way to select ripe ingredients for this cake?
Absolutely! When choosing your ingredients, especially the eggs, butter, and buttermilk, ensure they are fresh and at room temperature for optimal mixing. This helps to create a fluffy and moist texture in your cake. I recommend using eggs that are no more than a week old, and butter should be soft but not melted.
How should I store leftover Bloody Red Velvet Cake?
Very! Store leftover cake in an airtight container in the fridge for up to 4 days. This keeps it moist and delicious. If you want to keep it longer, freeze slices wrapped tightly in plastic wrap and aluminum foil. They’ll stay fresh for up to 2 months!
Can I freeze the Bloody Red Velvet Cake? If so, how?
You can absolutely! To freeze, slice the cake and ensure it's completely cooled. Wrap each slice tightly in plastic wrap, then in aluminum foil, to prevent freezer burn. When ready to enjoy, thaw the slices in the refrigerator overnight or at room temperature for a few hours. If you're feeling indulgent, you can warm them in the microwave for 10-15 seconds before serving!
What should I do if my meringue buttercream looks curdled?
No worries! If your buttercream starts looking curdled, just continue whipping it vigorously. It may take a minute or two, but it will come together and become smooth again once it cools to the right consistency. Be patient; the most beautiful buttercream requires a little TLC!
Are there any dietary considerations for this cake?
Indeed! If you have allergies, make sure to check the ingredients, especially for eggs and dairy. You can easily make this cake dairy-free by using vegan butter and coconut cream, and substituting eggs with flax eggs or aquafaba for a vegan option. This way, everyone can enjoy a slice of this delightful Bloody Red Velvet Cake!
How can I ensure the candy glass stays intact when serving?
Great question! When decorating, I recommend adding the candy glass shards just before serving. This helps maintain their crispness. If you're preparing the cake in advance, store the candy glass separately and add them to the cake at the last minute to prevent them from becoming too soft. Enjoy your spooky treat!
Indulgent Bloody Red Velvet Cake with Spooky Candy Glass Shards
Ingredients
Equipment
Method
- In a saucepan, combine granulated sugar, light corn syrup, water, and cream of tartar. Stir over medium heat until dissolved, then increase the heat and boil until the mixture reaches a hard crack stage of 300ºF. Pour the hot mixture onto a parchment-lined baking sheet and let it cool completely for about 2 hours before breaking it into dramatic candy glass shards.
- Preheat your oven to 350ºF (175ºC) while you prepare your cake pans. Grease two 9-inch round cake pans with butter, then line the bottoms with parchment paper.
- In a large mixing bowl, whisk together the all-purpose flour, cocoa powder, baking powder, baking soda, and salt.
- In your stand mixer, cream the softened butter with both granulated and brown sugars until light and fluffy, about 3-5 minutes. Add the eggs one at a time, mixing well after each addition.
- Blend in the sour cream, vanilla extract, and vinegar, mixing thoroughly until well combined.
- In a separate bowl, combine buttermilk and red food coloring. Gradually add this mixture to the dry ingredients, alternating with the flour mixture, until everything is well blended and smooth.
- Divide the cake batter evenly between the prepared pans and smooth the tops with a spatula. Bake for 25-27 minutes or until a toothpick inserted in the center comes out clean.
- Allow the cakes to cool in their pans for 10 minutes before transferring them to wire racks to cool completely.
- While the cakes cool, whisk together egg whites, granulated sugar, and a pinch of salt over simmering water until the sugar dissolves. Remove from heat and whip the mixture until glossy and cool.
- Gradually add softened butter, mixing until the buttercream is smooth and creamy.
- Gently heat heavy cream and the white chocolate in a saucepan over low heat, stirring until fully melted and smooth. Stir in a few drops of red food coloring to achieve a bloody effect.
- Spread a layer of meringue buttercream between the cake layers, adding dark chocolate shavings. Stack the layers and place the assembled cake in the freezer for about 30 minutes to set.
- Frost the outer layer of the cake with the remaining meringue buttercream. Finish by pouring the white chocolate ganache over the top, allowing it to drip down the sides.
- Decorate the cake with candy glass shards and any additional ganache as desired.

Leave a Reply