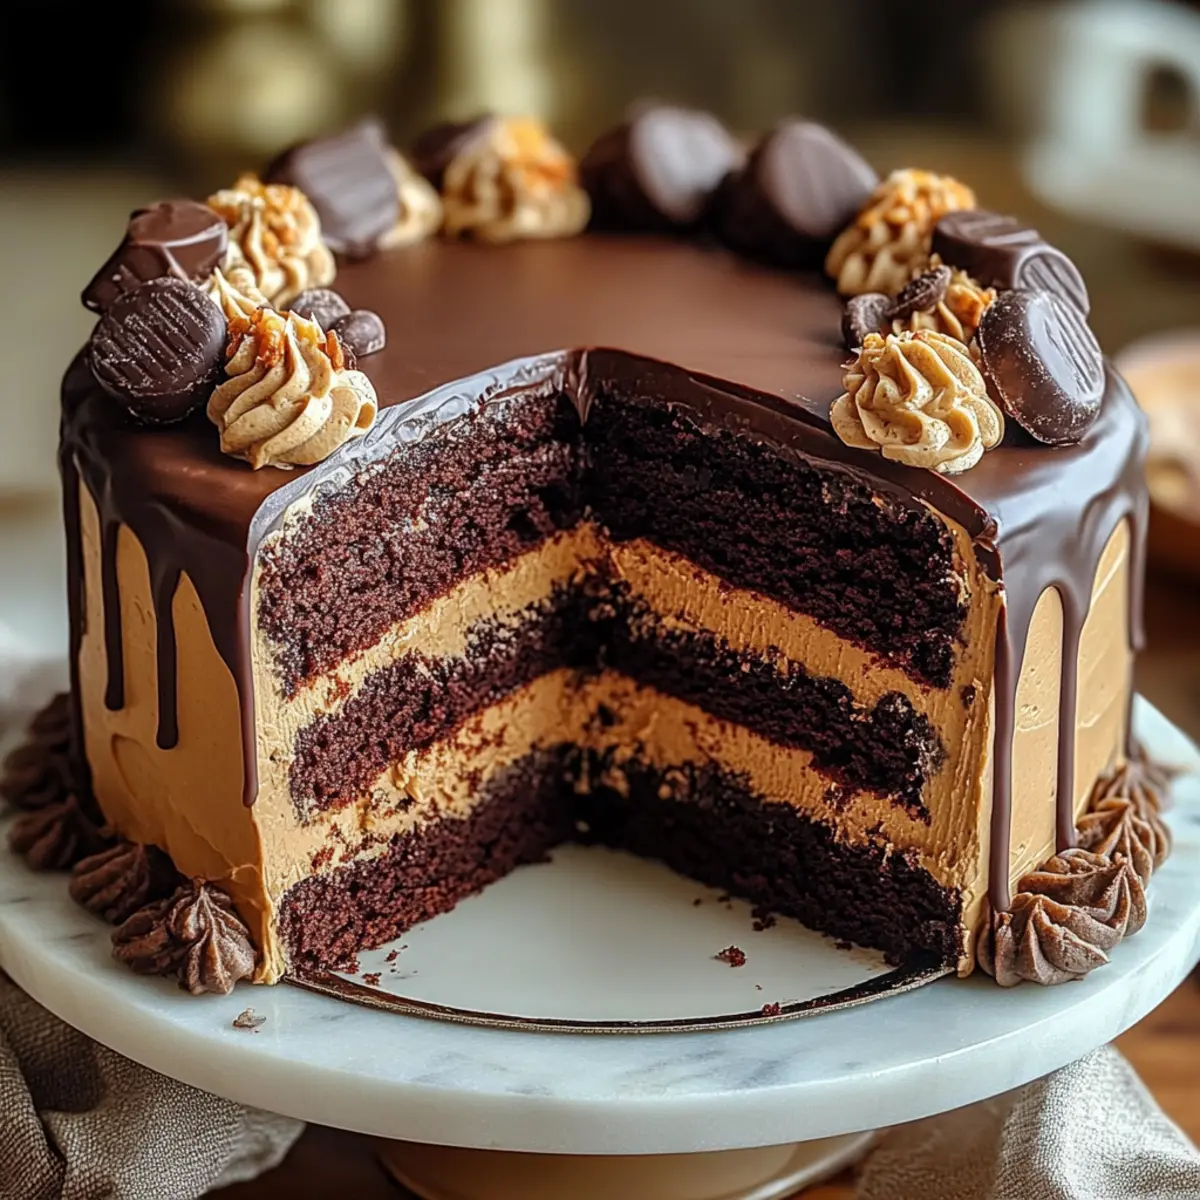
There’s something magical about the first slice of cake that reveals rich chocolate layers and a swirl of creamy peanut butter frosting. As I lifted the slice from the plate, I could practically hear the cheers of joy from family and friends waiting to dive into this Ultimate Reese's Cake: A Decadent Chocolate and Peanut Butter Masterpiece. This recipe not only satisfies your sweet cravings in a fraction of the time traditional cakes take to prepare but also guarantees crowd-pleasing results, making it the perfect centerpiece for birthdays or any celebration. Whether you're baking for a gathering or just treating yourself, this cake promises a scrumptious experience that melds together beloved tastes and textures. Are you ready to unlock the secret to your new favorite dessert?

Why is this cake a must-try?
Decadent Flavor: The rich chocolate layers paired with creamy peanut butter frosting create a flavor explosion that will have everyone asking for seconds.
Crowd-Pleasing Appeal: Perfect for birthdays or casual get-togethers, this cake is sure to impress family and friends alike, making it a go-to dessert for any occasion.
Easily Customizable: Want to switch things up? Try making cupcakes or opt for a gluten-free version without sacrificing flavor. There’s a delight for everyone!
Quick and Simple: This straightforward recipe requires minimal prep time, making it an excellent choice for beginner bakers or busy home chefs who want to whip up something special in no time.
Textural Delight: Experience the lovely contrast of moist cake and crunchy Reese's toppings; each bite is a delightful journey of flavors and textures.
Reese's Cake Ingredients
• Get ready for a tasty adventure!
For the Cake
- Unsweetened Cocoa Powder – Primary source of rich chocolate flavor; consider using Dutch-processed cocoa for a milder taste.
- All-Purpose Flour – Provides the cake's structure; measure accurately to avoid density.
- Granulated Sugar – Sweetens the cake and improves moisture; a sugar substitute can be used for a lower-calorie option.
- Eggs – Binds the ingredients together and adds moisture; best if at room temperature.
- Milk – Adds richness; swap it with almond or oat milk for a dairy-free alternative.
- Baking Powder and Baking Soda – Essential leavening agents; fresh ingredients ensure the best rise.
- Salt – Enhances flavor and balances sweetness.
- Butter – Adds moisture and a rich taste; make sure it’s softened for easy blending.
For the Frosting
- Creamy Peanut Butter – Key for a smooth frosting texture; chunky peanut butter offers added crunch.
- Powdered Sugar – Sweetens and thickens the frosting; sifting can prevent lumps.
- Heavy Cream – Adds luxurious richness; milk can be used for a lighter option.
Toppings
- Chopped Reese's Cups – These are your crowning glory, giving a delightful crunch on top of your Reese's cake!
Step‑by‑Step Instructions for Ultimate Reese's Cake: A Decadent Chocolate and Peanut Butter Masterpiece
Step 1: Preheat the Oven
Start by preheating your oven to 350°F (175°C) while you prepare your cake pans. Grease two 9-inch round baking pans thoroughly and line the bottoms with parchment paper to ensure a seamless cake release. This step is crucial for achieving those perfect chocolate layers in your Reese's cake.
Step 2: Sift the Dry Ingredients
In a large mixing bowl, sift together the unsweetened cocoa powder, all-purpose flour, baking powder, baking soda, and salt. This process aerates the dry ingredients, ensuring a light and fluffy texture throughout the cake. Take a moment to admire the rich chocolatey aroma as you mix these essential components.
Step 3: Combine the Wet Ingredients
In another bowl, whisk together the eggs, milk, softened butter, and vanilla extract until fully blended. Be sure to mix until smooth and light in color, which takes about 2-3 minutes. This combination will add moisture and richness, which are vital for the decadent layers of the Ultimate Reese's Cake.
Step 4: Mix Wet and Dry Ingredients
Gradually add the dry ingredient mixture into the wet ingredients, beating on medium speed until well combined, which should take about 2 minutes. The batter will begin to thicken, and the colors will deepen as the chocolate flavor intensifies, preparing you for the flavorful layers ahead.
Step 5: Add Boiling Water
Carefully stir in the boiling water until the batter is smooth; it will be quite thin, but that's perfectly fine! This step enhances the chocolate flavor and keeps the cake wonderfully moist. Make sure to do this quickly to maintain the heat, which helps the dry ingredients fully hydrate.
Step 6: Bake the Cake
Pour the batter evenly into the prepared pans and place them in the preheated oven. Bake for 30-35 minutes or until a toothpick inserted into the center comes out clean. Keep an eye on the cakes as they rise; the edges should pull slightly away from the sides of the pan when they’re perfectly baked.
Step 7: Cool the Cake
Remove the pans from the oven and let them cool in the pans for about 10 minutes. Afterward, gently run a knife around the edges and flip the cakes onto wire racks to cool completely. This cooling step is essential for preventing a soggy bottom on your exquisite Reese's cake.
Step 8: Prepare the Frosting
In a mixing bowl, cream together the softened butter and creamy peanut butter until light and fluffy, approximately 3-5 minutes. Gradually add in the powdered sugar, mixing on low speed, followed by heavy cream until you reach your desired frosting consistency, perfect for slathering between layers.
Step 9: Assemble the Cake
Once the cake layers are cooled, place one layer on your serving plate and spread a generous layer of peanut butter frosting on top. Gently place the second layer atop and frost the top and sides of the cake. Make sure each layer is well-coated so every slice showcases the delicious peanut butter frosting.
Step 10: Decorate with Reese’s Cups
Finish your Ultimate Reese's Cake by decorating the top with chopped Reese’s cups, ensuring they’re evenly distributed for that crunchy, delightful texture. This not only elevates the cake’s appearance but adds an irresistible touch of chocolate and peanut butter in every bite.

Reese's Cake: Flavorful Twists Await
Feel free to let your creativity shine by personalizing this delectable cake with exciting variations and substitutions!
- Cupcake Version: Bake the batter in cupcake pans for bite-sized treats, adjusting baking time to 18-22 minutes. Perfect for parties!
- Gluten-Free Alternative: Swap in a gluten-free flour blend, ensuring all other ingredients are also gluten-free for everyone to enjoy this delight.
- Chunky Peanut Butter: Use chunky peanut butter in the frosting for delightful textural contrast, amplifying that peanut butter goodness!
- Nut Butter Swap: Try almond or cashew butter for a different nutty twist; the cake will maintain its creamy richness with a unique flavor profile.
- Chocolate Chip Boost: Fold in chocolate chips into the cake batter for an extra chocolatey experience; a chocolate lover's dream come true!
- Spicy Kick: For a twist with heat, add a pinch of cayenne pepper to the cake batter; this surprise will intrigue your taste buds and warm your heart.
- Flavor Infusion: Experiment with flavored extracts, such as almond or hazelnut, in the batter or frosting to create a layered flavor sensation.
- Fruity Surprise: Layer fresh banana slices between the cake and frosting for delightful freshness; it complements chocolate and peanut butter beautifully.
Feel free to explore these variations and find your favorite twist; after all, baking should be about enjoyment and creativity!
Make Ahead Options
These Ultimate Reese's Cake preparations are ideal for busy home cooks looking to save time without sacrificing flavor! You can bake the cake layers up to 2 days in advance. Once cooled, wrap them tightly in plastic wrap and refrigerate to maintain their moistness. The peanut butter frosting can also be prepared up to 3 days ahead and stored in an airtight container in the fridge; just give it a quick mix before using. When you're ready to serve, assemble the cake with the frosting and chopped Reese’s cups. This way, you’ll enjoy a fresh, stunning dessert with minimal effort on the day of your celebration!
What to Serve with Ultimate Reese's Cake?
Indulging in a slice of this chocolate and peanut butter masterpiece is one thing, but pairing it with the right sides can elevate your dessert experience even further!
-
Vanilla Ice Cream: A classic pairing that complements the richness of the cake, providing a cool, creamy contrast.
-
Espresso or Coffee: The bitter notes balance the sweetness while enhancing the chocolate flavors for a delightful finish to your meal.
-
Mixed Berry Salad: Fresh, tart berries cut through the richness, adding a refreshing element that brightens each bite of cake.
-
Chocolate Sauce Drizzle: For an extra layer of decadence, warm chocolate sauce can be drizzled over the cake, enhancing the chocolate flavor.
-
Peanut Butter Cookies: Keep the theme going with some homemade peanut butter cookies on the side, adding more delightful crunch and flavor.
-
Caramel Sauce: A touch of warm caramel adds a sweet and salty twist that brings depth to each slice of cake.
-
Whipped Cream: Light and airy, whipped cream provides a fluffy counterpart that matches the smoothness of the peanut butter frosting.
-
Nutty Trail Mix: A crunchy mix of nuts and seeds brings out the peanut butter flavor and provides various textures that play well with the moist cake.
How to Store and Freeze Ultimate Reese's Cake
Fridge: Store leftover Reese's cake tightly covered in the refrigerator for up to 3 days. This helps maintain its freshness and flavor while keeping the frosting creamy.
Freezer: To freeze, wrap individual slices or the whole cake in plastic wrap and then aluminum foil. It can be stored in the freezer for up to 2 months. Thaw in the fridge before serving.
Reheating: If desired, gently warm individual slices in the microwave for about 10-15 seconds. This will enhance the flavor and texture of the chocolate and peanut butter layers.
Make-Ahead: Cake layers can be baked and frozen ahead of time. Frost them once they are completely thawed for the best results!
Expert Tips for the Best Reese's Cake
- Room Temperature Ingredients: Using room temperature eggs and butter ensures smooth mixing and better texture in your Reese's cake.
- Don't Overmix: Avoid overmixing the batter once you add the flour; this can develop gluten and lead to a dense texture.
- Watch Your Baking Time: Check for doneness a few minutes early with a toothpick; overbaking can dry out your cake.
- Cool Completely: Allow the cake layers to cool thoroughly on wire racks before frosting to prevent melting and sliding.
- Frosting Consistency: Aim for a thick yet spreadable peanut butter frosting; adjust with powdered sugar or cream as needed for perfection.
Ultimate Reese's Cake Recipe FAQs
How do I choose ripe ingredients for this cake?
Absolutely! For the best results, choose ingredients that are fresh. Use cocoa powder that doesn’t have a dull or fading color. For eggs, fresher ones will bind better, giving your cake a lighter texture. Always inspect the milk for freshness; it should smell clean without any sour notes. Smooth and creamy peanut butter is essential, so check the texture—chunky varieties can be used but will alter the frosting consistency.
What’s the best way to store leftover cake?
Very good question! Store leftover Reese's cake in the refrigerator, tightly covered with plastic wrap or in an airtight container for up to 3 days. This helps retain its moisture and flavor. You can enjoy it chilled or let it sit at room temperature for about 20 minutes before serving for optimal taste.
Can I freeze the Ultimate Reese's Cake?
Certainly! To freeze your Reese's cake, wrap individual slices or the whole cake tightly in plastic wrap and then in aluminum foil. This double layer helps to prevent freezer burn. It can be stored in the freezer for up to 2 months. Thaw it in the fridge overnight when you’re ready to enjoy it. Frosting can be a bit tricky if frozen; make sure to frost after the cake has fully thawed to ensure the best texture.
What common issues should I look out for while baking?
Great question! If your cake turns out too dense, it might be due to overmixing the batter after adding the flour; gently mix to keep it light. If the cake domes too much while baking, tap the pans gently on the counter before placing it in the oven to release any air bubbles. Lastly, if your cake is dry, this could be a result of overbaking. Always use a toothpick checked around the 30-minute mark; it should come out with a few moist crumbs, not clean.
Are there any dietary considerations for this recipe?
Absolutely! This Ultimate Reese's Cake is vegetarian, but for gluten-free options, substitute all-purpose flour with a gluten-free blend. Remember to check labels on chocolate and peanut butter for any allergens if that’s a concern. If anyone in your household has nut allergies, consider using sunbutter or a seed-based alternative for the frosting. Always adjust according to your guest’s dietary needs for a delightful get-together!

Indulgent Reese's Cake: A Decadent Chocolate Peanut Butter Delight
Ingredients
Equipment
Method
- Preheat your oven to 350°F (175°C) and prepare two 9-inch round baking pans by greasing them and lining the bottoms with parchment paper.
- Sift together the cocoa powder, flour, baking powder, baking soda, and salt in a large mixing bowl.
- In another bowl, whisk together the eggs, milk, butter, and vanilla extract until smooth and light in color.
- Gradually add the dry ingredients to the wet ingredients, mixing on medium speed until well combined.
- Carefully stir in the boiling water until the batter is smooth; the batter will be thin.
- Pour the batter evenly into prepared pans and bake for 30-35 minutes, checking for doneness with a toothpick.
- Let the cakes cool in the pans for about 10 minutes, then transfer to wire racks to cool completely.
- Cream together the softened butter and peanut butter until light and fluffy. Gradually add powdered sugar and heavy cream until desired consistency is reached.
- Assemble the cake by layering the first layer on a serving plate, frosting generously, then add the second layer and frost the top and sides.
- Decorate with chopped Reese’s cups on top.

Leave a Reply